Pioneer Diamante Pro 18,000 BTU Mini Split Review: Worth It? (November 2026)
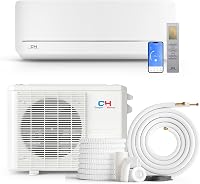
The Pioneer Diamante Pro 18000 BTU 230V is a Pioneer mini split for a larger single zone with a matching heating and cooling load. Choose it after confirming room sizing, winter heating needs and the full installation scope.
On this page (9 sections)
- Is this Pioneer mini split right for your space?
- What does the installation kit cover?
- How should you plan power, placement and drainage?
- Can it handle your heating and cooling needs?
- Which controls will you actually use?
- Which smaller alternative should you choose?
- How do you keep the system working well?
- Which buying mistakes should you avoid?
- Who should choose this Pioneer mini split?
The Pioneer Diamante Pro 18000 BTU 230V is a good Pioneer mini split for a larger single room or open zone that needs independent heating and cooling. Choose it for the room's calculated load, then confirm electrical work, drainage and winter heating capacity before ordering.
Its main appeal is focused comfort without extending central ductwork. The smaller Pioneer suits a lower room load, while the Senville alternative makes sense for buyers who prioritize app routines and voice control.
Is this Pioneer mini split right for your space?
This model suits one larger, defined zone, such as an open addition, living area or workshop. It is less suitable for several closed rooms that need separate temperatures.
Pioneer Diamante Pro 18000 BTU 230V: Best for larger single zones

- 18,000 BTU cooling and heating
- 21.0 SEER2
- Recommended for 500 to 750 sq ft
- 230V
A larger single-zone option for an addition, open living area or workshop with a matching load. Motorized airflow and remote temperature sensing help you direct comfort where you use the room.
Pros
- Heating, cooling, Dry and Fan modes
- Variable-speed inverter compressor
- Includes an insulated line set and installation materials
- Motorized up-down and left-right louvers
Cons
- Requires 230V power
- App control needs a separately sold module
- One indoor head cannot give separate rooms independent control
Pioneer recommends the system for 500 to 750 sq ft, with 18,000 BTU of cooling and heating capacity. Those figures narrow your choices, but an installer should calculate the space's load before you commit.
A room with broad afternoon-facing windows can gain more heat than a shaded room of equal size. High ceilings, air leaks and weak insulation also change what the equipment must handle.
Don't buy extra capacity just to feel safe. An oversized system can have trouble maintaining steady cooling and moisture removal when the room needs only a small amount of output.
The inverter compressor adjusts output as demand changes, but correct sizing still matters. Ask your installer to consider both peak demand and the lower loads the room sees during mild weather.
Skip this model if your goal is independent comfort in several bedrooms behind closed doors. A single wall unit needs an open airflow path, and a hallway installation won't give each bedroom its own control.
Use our mini split sizing guide to gather the room details your installer will need.
What does the installation kit cover?
The package includes both main units, the remote and several connection materials. It gives your installer a starting set of parts, while the building determines the full scope of work.
The kit contains an insulated line set, signal cable, drain hose, wall sleeve, putty, sealer, wrapping tape, drain spout and rubber feet. The outdoor condenser comes factory-charged.
A factory charge does not make the refrigerant connection work automatic. A qualified installer still needs to follow the manual's connection, evacuation, leak-check and commissioning procedures.
Before ordering, have the installer measure the actual route between units, including bends and vertical travel. A straight-line measurement through the wall can miss the length needed to reach a suitable outdoor location.
Ask for a written scope covering mounting hardware, wall work, electrical work, drainage and any extra connection materials. That makes it easier to compare quotes for the same finished job.
Our guide to installing a mini split yourself explains the work involved and where qualified help fits.
How should you plan power, placement and drainage?
Plan the circuit, airflow and water route together before choosing where either unit will sit. A convenient wall location can become a poor choice if it blocks service access or leaves nowhere for condensate to drain.
This Pioneer requires 230V power. Have an electrician confirm the circuit, wiring, breaker, disconnect and grounding requirements from the exact equipment instructions and local code.
For the indoor head, choose a location with the clearances the manual requires and room for air to travel across the occupied area. Avoid hiding it above tall furniture or pointing its strongest airflow directly at a desk or bed.
Place the outdoor unit where it has clear airflow and can be reached for service. In snowy areas, the installer should account for snow buildup and water released during heating defrost cycles.
Cooling creates condensate at the indoor coil, so the drain needs a planned route. Gravity drainage needs a continuous suitable fall; routing that rises or sags can cause water to back up.
If gravity drainage isn't practical, discuss a pump before the work starts. Our guide to mini split condensate pumps explains when that extra component makes sense.
Can it handle your heating and cooling needs?
The Diamante Pro offers Cooling, Heating, Dry and Fan modes, with a variable-speed DC inverter compressor. Its motorized louvers move air vertically and horizontally to help distribute conditioned air across the zone.
Efficiency is 21.0 SEER2 for cooling and 9.5 HSPF2 for heating. These seasonal measures help compare equipment, while your climate, setpoint, room load and electricity rate determine running costs.
Pioneer specifies operation down to -4°F in heating and 122°F in cooling. For winter use, have the installer compare available output at your local winter design temperature with the room's heat loss.
An operating limit describes when equipment can run, rather than promising full output at that temperature. If the system will be your only heat source, settle the backup-heat plan before installation.
Our guide on how cold a mini split heat pump can work explains which cold-weather performance figures matter.
During cold, damp weather, heat pumps may pause normal heating to defrost the outdoor coil. Keep the outdoor unit's airflow and drainage paths clear, and ask the installer what normal defrost behavior looks like.
Which controls will you actually use?
The included remote provides temperature control and I FEEL sensing, so you can manage the zone without adding phone control. I FEEL senses temperature near the remote, making its location part of your comfort setup.
Keep the remote near the area you use, following the manual's guidance. Avoid direct sun, a warm electronics shelf or another spot that gives it an unrepresentative room temperature.
Turbo can help when you first need a stronger response, while Mute and Sleep offer options for quieter periods. Eco, Timer and Memory functions let you adapt operation to your routine.
Start with a steady setpoint and adjust airflow before making repeated temperature changes. Moving the setpoint far beyond your desired temperature won't make the room comfortable instantly and can leave it too hot or cold later.
App control needs a separately sold Pioneer AirLink module. If you want to change settings away from home, include that component and its setup in the plan from the start.
Which smaller alternative should you choose?
Choose a smaller system when the calculated room load calls for less capacity. Between these alternatives, the main choice is Pioneer’s familiar comfort controls versus Senville’s app and voice features.
Senville LETO for app routines and voice control
The Senville LETO 12000 BTU suits a smaller load when you want Alexa commands, phone access or scheduled temperature routines. It includes a 16 ft line set and communication wire, and professional installation is required.
Senville specifies heating operation down to 5°F. Skip it as your sole winter heat source unless an installer confirms that its cold-weather output meets your needs.
Senville backs the parts and compressor with a 5-year warranty that excludes labor. Ask who will handle diagnosis and service locally, since replacement-part coverage doesn't cover every service expense.
Don't choose this model just for its controls if the room needs more output. App access is useful only after the equipment fits the space.
Smaller Pioneer mini split for an addition
The Pioneer Diamante Pro 12000 BTU 230V fits buyers whose addition or defined room needs less capacity but who want the larger model's core modes and remote features. Pioneer recommends it for 350 to 500 sq ft.
Its cooling efficiency is 20.0 SEER2, and it shares the larger model's heating efficiency and operating temperature limits. The decision between the Pioneers should begin with load matching, rather than the small difference in seasonal cooling efficiency.
Choose the smaller Pioneer for a suitable room where remote control is enough. Skip it if the load calculation calls for the larger unit, and remember that its electrical requirement still needs planning.
If your room needs more capacity than these alternatives, compare our guide to 18,000 and 24,000 BTU mini splits.
How do you keep the system working well?
Keep filters, airflow paths and condensate drainage clean, and arrange service according to the manual. The Pioneer's washable dust filter and self-clean cycle support routine care, but the coil and drain still need attention.
Inspect the filter regularly, especially in dusty workshops or homes with pets. Clean it as directed and let it dry fully before putting it back.
Leave the indoor intake and outlet clear of curtains, shelves and furniture. Outdoors, remove loose leaves and keep plants from growing into the required clearance space.
Watch for water leaking indoors, new noises or a lasting drop in comfort. These changes call for checking the cause rather than repeatedly lowering the setpoint.
Use the system's modes with a clear purpose. Dry mode can help manage moisture under suitable conditions, but it won't repair a blocked drain or solve water entering through the building.
Which buying mistakes should you avoid?
Avoid sizing by floor area alone, assuming the kit covers every job, or choosing controls before capacity. These mistakes can leave you with equipment that costs more to install or struggles to serve the room.
A garage needs special attention to insulation, door leakage and how often the large door opens. Buying a larger unit without addressing major air leaks can leave the same comfort problem in place.
Don't expect one head to push balanced airflow through several doorways. If closed rooms need separate temperatures, discuss a different zoning plan before buying a single-zone system.
Also avoid comparing quotes that cover different work. Confirm who handles electrical work, wall sealing, startup and any required permits, then compare the complete installation.
For a broader view of system layouts and installation terms, read our mini split heat pump guide.
Who should choose this Pioneer mini split?
Choose the larger Pioneer when the load calculation supports it, the zone has a useful airflow path and the installation plan is complete. It suits buyers who want heating and cooling for an open space and are comfortable starting with remote control.
Choose the smaller Pioneer when the room needs less output and you want the same core comfort features. Choose Senville when its capacity and winter performance fit, and app routines or Alexa control are priorities.
Before ordering any Pioneer mini split, get the equipment choice and full installation scope confirmed together. If controls and brand differences remain your deciding factors, read our Senville vs Pioneer mini split comparison.
For more planning help, visit mini split sizing and installation basics. Manufacturer reference: Pioneer mini split systems.
Frequently asked questions
What size room is the Pioneer Diamante Pro 18000 BTU 230V for?
Pioneer recommends this system for 500 to 750 sq ft, but choose it by the room's calculated load; insulation, ceiling height, windows, sun exposure and local climate affect capacity needs. An open addition and a drafty garage of the same size can need different equipment.
Does the Pioneer Diamante Pro 18000 BTU 230V heat in cold weather?
Yes, Pioneer specifies heating operation down to -4°F for this model; ask your installer to compare its available heating output at your winter design temperature with the room's heat loss. Our guide to mini splits in cold weather explains why an operating limit and heating capacity are different.
Does the Pioneer Diamante Pro include an installation kit?
Yes, it includes the indoor air handler, factory-charged outdoor condenser, remote and installation materials, including an insulated line set and drain hose; have your installer check the route, mounting needs and electrical scope before ordering. Included materials may need additions to suit your building and local requirements.
Can you control the Pioneer Diamante Pro with an app?
Yes, app control requires a separately sold Pioneer AirLink module; the handheld remote comes with the system. Include the module and its setup in your installation plan if remote access matters; the Senville LETO alternative includes app and Alexa control, but it also needs to match your room's load.